
 |
| It starts like this and nothing will work to get you back into windows. |
For this Mission you will Need the Following Tools
 |
| USB to SATA/IDE Connector. |
1. USB to SATA/IDE connector cable tool.
2. A working Computer or Laptop
3. Storage medium or space to place backed up files.
3. PC Toolkit or Screwdriver.
Procedure
Step 1
To demonstrate this procedure I will be using a laptop, however this will work just fine on a desktop PC.
1.Once you are satisfied that windows recovery, safe mode or system repair or restore cannot help in returning windows to normal then its time to rescue your files.
2. Power off the system and get out your toolkit or your handy screwdriver from its hiding place. After properly grounding yourself with your Anti-static wrist band or discharging static electricity from your body, proceed to locate the Hard Disc Drive (HDD) cover at the back of the PC:
 |
| Remove the Hard Disc Drive (HDD) Cover |
3.Remove the back cover and unhook the Hard Disc Drive(HDD) carefully. For most modern laptops the Hard Drive will be easily accessed and involves a single or a few screws being removed for other the hard drive to be removed (Others are deep within the chassis of the laptop and will involve you pulling it apart).
 |
| Internal Hard Disc Drive (HDD) |
 |
| Remove The HDD from its cradle |
 |
| This is the laptops SATA -HDD |
Retrieving Your Files From The Hard Drive
Step 2
A
1. Now that you have retrieved the Hard Drive (HDD) from the PC its time to hook it up using the USB to SATA/IDE connector from earlier.
2. Using the power adapter brick and the SATA power molex converter if necessary, connect the HDD to the power brick:
 |
| Power brick with SATA Power Molex converter and HDD |
 |
| The SATA Power Molex Converter |
 |
| Connect the SATA Power to the HDD |
 |
| USB Data cable for the USB to SATA connector. |
Step 2
B
Select the end on the connector that matches your drive type. In most new laptops this will be a SATA connection but in older drives they use IDE connector that is both present on the SATA to USB connector cable.
 |
| This end will work on older IDE Drives |
 |
| This end will Work for My SATA Drive. |
 |
| Sata Data Cable in Red |
 |
| Connect the SATA Data Cable. |
 |
| Connect everything to the drive. |
 |
| Now the power and Data cables are all hooked up. |

 |
| Connect the setup to your computer by placing the USB into the USB hub of your PC. |
When everything is connected satisfactorily go ahead and connect the USB to the PC, be sure to check your wiring to ensure everything is snug and well connected. Make sure the drive is on a flat surface and has access to cool air. Double check the data cable to see that its connected right. If everything is good,plug the power brick into a electrical outlet.
The drive should hum and come to life. A windows will then pop up on your windows PC and it should open, if not go to My computer to see the drive.Congrats you are almost complete.
Removing your files From the Non-booting Drive
Step 3
Now that the drive is up on the spear computer follow the steps below to successfully navigate to your files:
1. Open the new drive, mines labelled: K yours will most likely be different
 |
| New Drive that poped up after connecting the HDD to the PC |
2. Go to Users on the drive.
3. Look for a folder with the name of your old PC User account name.
 |
| My user folder is the one that's highlighted. |

5. You should now be faced with your old destinations that you once stored your files this includes: Desktop, downloads, my documents and more, simply browse to the area and copy your files and move them to a new storage drive or current PC you are on for backup.
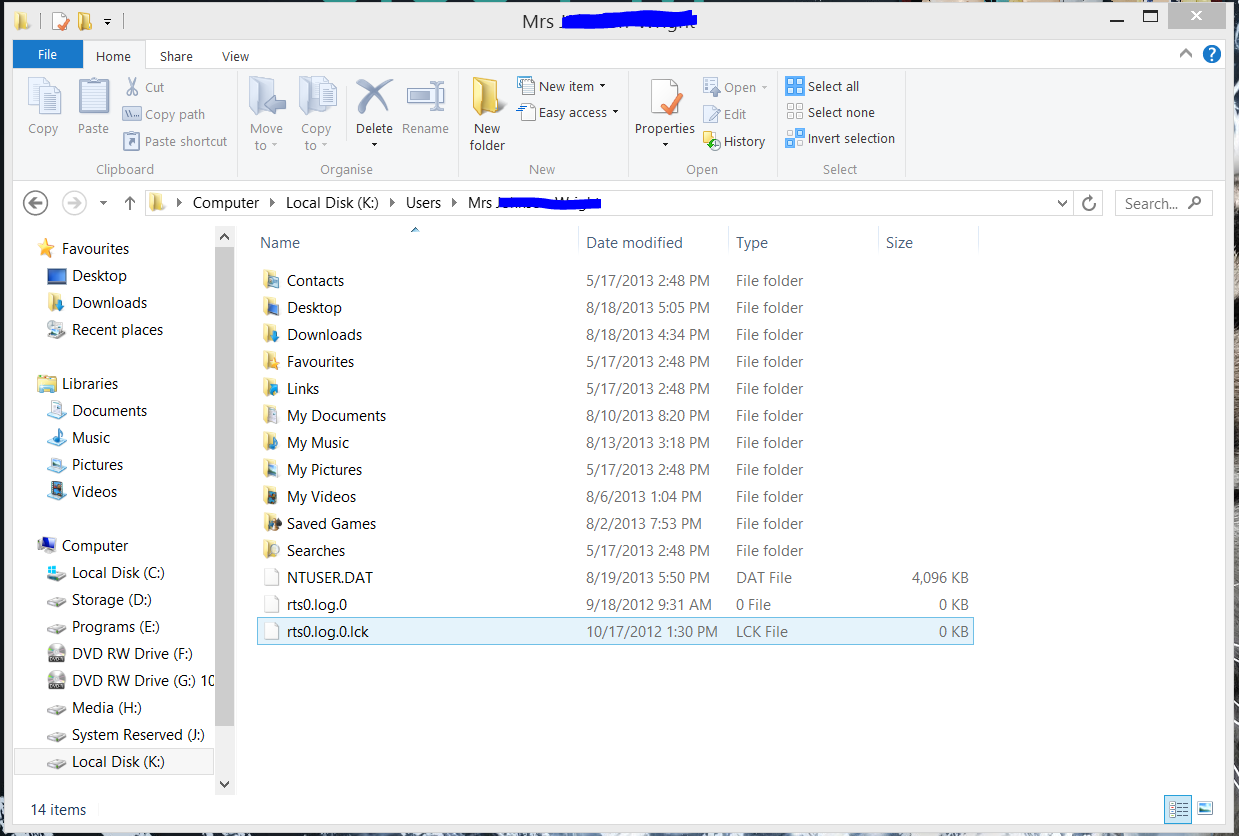 |
| All your Usual Storage area that contain your files. |
Important Notes
If for some strange reason your drive is empty or was erased you can attempt to recover the deleted files using this guide we created here. Also this USB to SATA IDE connector can double as a means of connecting drives externally so you can keep it and have extra drives around that you can use for storage.
Related Articles
I use Windows vista dual boot with Ubuntu 12.04
ReplyDeleteIf my windows have problem like this, i will must follow your step to solve.
You're cool and very good job Ricky, thanks for share a good content..:)
Thank you this method as allowed me to save many of my clients data that is stuck on windows so many times its hard to count.
DeleteMy personal favorite, boot to an Ubuntu Live CD, and you should be able to read the data on the hard drive and then copy it to an external drive. Did this just last week for a friend whose laptop died on him. I have also used this at work to look for data on hard drives that have otherwise been compromised by malware.
ReplyDeleteGreat tip David, good to know. I have also found that connecting the problem drive in another computer as a secondary drive also works. The cable set used here is just convenient.
Delete