Showing posts with label how to. Show all posts

Tuesday, September 15, 2015

PC Games No sound FIX

I am sure you are here today out of share frustration as you have installed a new PC game only to have the sound not work or work only partially. This no sound issue can occur in any Game and happens either at a point in Games or at the very start, this includes in intro video sequences as well.

You may loose audio or sound totally or the Game starts with Audio and then it cuts out. In some cases you even have background sound but no dialogue or you cannot hear what characters are saying.I have personally seen this issue allot of times so let me assist you with a relatively easy fix for this issue for Windows users.

How to Fix No sound Issues in Games?

PC Games No sound FIX


To fix such a issue you will need to:

1. Go to your computers Audio control Manager such as Realtek or another brand based on your computer.
2. Under speaker configuration set the mode to Stereo, and make sure that the front left and right speakers are being used.
3. Go back to your Game and this will most likely bring back the Audio to full working condition.

As an alternative you can do the same thing by right clicking on volume control and going to Playback devices. Then selecting your speakers with the green tick and selecting configure and then selecting stereo and front left and right from the next screen and finishing the setup which will give you the same effects as above of restoring your Games Audio.

This will not work in all cases but in most cases where you are having issues in a PC Game you should try this to actually get your Audio problems fixed.

If you have found that this has worked for a particular Game please share the name of the Game in the comments to let other users know to save them valuable time in fixing such an issue.

Friday, May 1, 2015

Graphics Card Artifacts Fix

If you have a Graphics card and you decide to hold unto it for a very long time one of two things will happen eventually and that is either the card will totally die on you or it will start to develop issues such as Graphics card Artifacts.

 Graphics Card Artifacts

These artifacts are so named because they are strange pixilations that appear on screen which makes using your computer impossible. Also your graphics drivers may also randomly crash and recover. The issue happens because of an unstable Video cards that's showing its age. It should also be noted that the issue of Video card Artifacts may occur with Video cards that are overclocked and that have become unstable because of settings that the card cannot run at a stable state.

How to Fix  Graphics Card Artifacts?


Well the truth is a bitter one, so here it is: you will need to change your video card very soon and any solution offered here will only be a temporary remedy so you would do well to use the time and get a new and affordable video card.

1. You can try upping the voltage on the card, this has know to make unstable cards stable once more.You can achieve this by your GPU's management software.
2. If you are overclocked return to defaults settings and you will be good once more.
3. Try changing the thermal compound or increasing the GPU fan speed to help with cooling.
4. Since the card is already dying you can attempt to reflow the solder on the card by mending the broken path ways by baking the card, some users have reported they were able to revive their cards with this crazy method. I recommend however that you try achieving this with a heat gun as you can control temperatures better.
5. If you are using a motherboard with the discrete on board graphics and not a video card the motherboard might be getting old and faulty.
6. Try updating your graphics card drivers, a unstable driver can cause all sorts of weird effects if you are lucky this might be the issue. 

I have personally seen the same issue arise in a three year old video card that I own and these are the actions that I have found to work best. I had to eventually replace the video card but this may be enough to buy you some time in between waiting for the new card to arrive.


Tuesday, December 30, 2014

Find files on Android for Android file transfer on your computer

If you have ever been in the Android file system you will quickly realize its not the easiest place to navigate especially when you are trying to find key files that you may need to locate to perform a Android file transfer on your computer, for example trying to find My Pictures Folder to back up your Gallery Pictures to your PC.

In today article we are going to guide you through finding the most important locations in the Android file system.
How to find your Way around the Android File System?
Find Files directly on the Android File System

How to Find Gallery Pictures and Videos in the Android File System?

To find your Gallery Pictures go to:
1. Internal Storage or local storage (For those on your Phone directly) 
2. Find a folder marked DCIM
3. Find Camera and all your pictures will be located here along with your video files.

OR for SD Card:

1. Go to SD Card, then DCIM folder.
2. Camera folder and that's it.

Find WhatsApp Pictures

Whats App pictures are downloaded to your Gallery by default but a separate copy is also kept in a sent folder within WhatsApp that you can retrieve:

1. Local storage if the App is directly on your phone
2. Find WhatsApp folder.
3. Media and now if you select WhatsApp images you can see what pictures you received or the ones that you have sent in a sent folder. Even if the pictures were deleted from Gallery or from WhatsApp they will still be here.

WhatsApp Video and voice notes contain the audio and so on that were sent or received in WhatsApp also.

Find Screen Captures

If you create a screen capture then you can find it in:

1. Device storage or internal storage.
2. Pictures Folder and find screenshots and inside are all your screen shots you have taken.

Find downloads Folder

Downloads folder is located in Local Storage and a folder marked downloads, your files will be inside.

Note that you can find any file normally by browsing to the Local storage root directory of the phone and looking for a folder with a name of the App that created it and simply open that folder and browse for what you are looking for unless its been given another name or hidden.    


Sunday, November 30, 2014

How to remove write protection from SD card?

In today's article I would love to teach you how to remove write protection from SD card, this is a common problem where users of SD cards insert them into a computer, Laptop or other digital gadget to find that they cannot write any data to the card. It can become frustrating having a SD card that you cannot use because you are getting the warning that its Write Protected.

What is Write protect?


Write Protection is a feature used on SD cards and other forms of digital storage which protects the storage device by preventing new data from been written to the drive. So people often enable the feature when they have something on a drive that they do not want erased or they don't want accidentally deleted.

Benefits:


  • Protects your data by avoiding accidental deletion or been overwritten.


How to remove write protection from a SD Card?

how to remove write protection from sd card
Slide the tab above the 2GB up as seen above

To remove the write protection from a SD card all you will need to do is:

1. Hold the SD card upright so that you can read the label.
2. Look on the left side of the card you will notice a small harrow pointing down and the marking lock written there along with a small plastic movable sliding tab.
3.  Slide the Tab from the down position (locked) to up which will remove the SD card write protect.
4. That's it simple right?


Method 2


Now if the above does not solve the issue then try the following:
1. Insert the memory card into the computer.
2. Go to My computer, find the SD card that you inserted.
3. Right click and choose Format then select quick format
Note: This will erase all data from the SD card including the data related to the write protect
4. When the format is complete the write protect should be removed and you can write data freely to your SD card.

I hope you were able to format your SD card it not a nice feeling being unable to use a SD card when Write protect is enabled and you do not know how it was enable or by who, but now you know how to disable it and even how to use it should you need the feature.

Friday, October 3, 2014

Get the Latest Version of PHOENIXCARD V3.09

PhoenixCard is a handy and invaluable tool or utility that allows you to burn a Android firmware unto a Micro SD card so that it becomes bootable and you can flash your Android device with a new Firmware or update.

This tool is often used in conjunction with a firmware file that can be downloaded else ware and is specific to your device and can be used to reformat or flash your Android device to fix issues such as your device freezing up or stuck on the Android boot logo when the device is starting up.

This tool will automatically make the firmware or Image file that you have chosen reformat or wipe your device.
Latest Version of PHOENIXCARD


Video Instructions

Written Directions on How to use PhoenixCard

1. Get your Micro SD card and connect it to your computer, be sure to format the SD card.
2. Download and extract the latest Version of PhoenixCard from below.
3. Open the PhoenixCard folder that you just extracted and launch the Green folder icon.
New Version of PHOENIXCARD
PhoenixCard User Interface

4. Where it says DiskCheck select the Micro SD Card from earlier from the drop down menu.
5.  Now simply Browse for the .IMG file that specific to your tablet or your tablets Firmware file.
6. Write Mode should be set to: Product.
7. Format the card to Normal in PhoenixCard then clear the notifications with the clear info button.
8.  Now you are ready to go so hit Burn and wait for the notification that says complete and remove the MicroSD card.
9. Place the MicroSD Card into your device allow it to boot and format your device.
10. When completed remove the MicroSD card and your device should bootup just fine.

Download the Latest Edition of PhoenixCard

Download PHOENIXCARD V3.09 :
Link 1
Link 2
Link 3

Get the Older Version:
PhoenixCard 3.06


How to save Battery Life on Any Android Device?

Making it through the day with even a little reserve charge is a miraculous feet now a days and if you can do it you are considered to be the Houdini of Tech. All things considered it very difficult to actually make it through a entire day without ruining for your phones life line in the form of a charger.

If you want to save Battery life and make sure that your phone can make it through a day on a single charge requires that you get very creative and maximize your battery life by following the following tips: 

Practical Tips that Will Save Your Battery Life 


save Battery Life on Any Android Device
Extend Battery Life


1. Go into settings and disable automatic screen brightness and adjust the brightness to a comfortable level that you can see clearly as close to the lowest setting as possible.

2. Use a simple dark background as your wallpaper without overly complicated designs and crazy colour pallets.

3. Uninstall any bloatware and unnecessary Apps.

4. Stop any App that's not system critical that chooses to run in the background.

5. Download a cleaner app from the play store and use it to remove junk files that's slowing your device down and hogging processing resources and eventually draining the battery.

6. When possible if you are using mobile data, WiFi or Bluetooth disable them as they are not been used and only turn them on intermittently through the day.

7. Notifications and Apps that Push notices or updates to your phone are data hogs and eventually a power drainer. Take the time to disable the auto update feature only have them send you notifications when you request it.

8. Consider running a light custom ROM that's great with battery life and all the normal bloatware has been stripped from it.

9. Play less mobile 3D intensive Games when you know you will be away from a power outlet for long periods.

10. Consider investing in a power bank especially if you are on Android Smartphone. You can check your best options of Battery Banks .

11. Enable the Android power saving Mode for when the battery reaches its Lowest point for added protection and don't check your phone every second obsessively.
save Battery on Any Android Device
Save Battery to do more


Those tips are the ones that I use on a daily basis to get me through the day will charge to spear, the thing about batteries that we all have to realize is that the technology has not change from the first time it was invented and technology keeps on advancing which requires more and more energy from a old technology. So we have to get really creative if we want to see progress in preserving battery life until a new form of battery is invented. 

Please take the time to leave a comment, we would love to hear your thoughts and best tips on saving battery life.

Monday, August 11, 2014

Irulu AK304 Android tablet stuck on Android Logo Fix

Is your Irulu AK304 or a similar tablet is stuck on the Android logo or boot screen and refusing to start up. The thing is it will never move from that screen no matter how hard you try. If you have tried to reset the device using the Android system recovery button combination that puts the device in a special mode for resetting the tablet and it failed then you have come to the right placed as we will help you in fixing your bricked tablet and bringing it back to life.

android tablet stuck on android logo
Irulu or similar Tablet Stuck at Android Logo

Issue to be Fixed: 

Android tablet stuck on Android Logo.

What cause the Issue?


The issue you are experiencing is caused by a corrupted Android operating system and no matter how many times you try resetting the Irulu AK304 or similar tablet it will not fix the issue.


The Solution

To fix the issue you will need to flash or reload a matching firmware to your device to get it working again using a tool called Phoenix card tool, a Micro SD Card 2 gigs or more and the following firmware that you will need to download: 1.P1-Q88DB-V1.2-2CAM-RA522A.rar

Although this exact firmware should work with the above Irulu AK304 its best to always check the ID number of your motherboard to make sure that the firmware that you are using is the correct one.

For example My tablet had the ID number of Q88DB-V1.2 and as you can notice the firmware file has the same ID number so the firmware will work and all the relevant features such as touch should work, if you get the firmware wrong features such as touch might not work.

How to find your Firmware if you are not using the same Tablet but a similar model? 

1. If you are using a similar looking tablet you will need to first open the unit and get the Motherboard ID number and record it.
2. Next go to this website and use the search box and search for your ID number and you should get a compatible firmware to download.
3. Follow the instructions below as you would for the Irulu and load your specific firmware.

Instructions

1. After downloading the Phonex card tool and the firmware above extract the zipped tool and launch the tool from green icon resembling a folder.

2. Connect your MicroSD card to your computer (Wipe or format the card to make sure its empty).

3. Extract the firmware file and using the Phoenix tool select the img file button to browse for the firmware file that you just extract and select it.

4. Select the SD Card in the Phoenix tool and select burn to burn the image to the SD Card to make the Card bookable. Be sure to select Product option and not startup !, as you are attempting to permanently flash the new firmware.

5.  Finally burn and when finished remove the SD Card and insert it into the Android device.

6. When inserted make sure the device is off and when inserted poweup the tablet with the SD card. It may take some time but leave the device to run for about 3-4 minutes. There will be a red bar that will eventually go green.

7. After instillation remove the SD card and power up once again and that should be it your tablet should now be fully functional after being dead.


I hope that this has helped in fixing your Android tablet that was stuck on the Android Logo as it did with mine, please feel free to leave a comment or ask a question below and as usual I will get back to you as soon as possible.

Sunday, August 10, 2014

samsung GT i5500 Too many pattern attempts

If you have a Samsung GT i5500 and you are faced with the issues of a screen displaying Too many pattern attempts then you will come to realize that this issue can be a real pain in the but to actually solve.

If the following method from this article does not work then you may have a special case that very specific to your phone model and those like the older Samsung GT i5500 which will require a different method to unlock or bypass the too many pattern attempts screen.
samsung GT i5500 Too many pattern attempts
samsung GT i5500 

How to unlock the Samsung GT i5500 with Too many pattern attempts warning?

So if no other method is working for you such as the article above that I have liked to that as helped so many people you may want to try the following method:

1. Power up the phone and Wait at the "Too many pattern attempt screen" and let the battery run down on your device to the low battery warning  pops up. A quick way of exhausting the battery is to leave it powered on and occasionally check back over a period.

2. When the low battery warning appears click battery usage and then click on the Home Button

3. You should now be on the Home screen, go to location&security in settings and find and disable the pattern lock or simply try and put in the old one that worked to change it.

4. If the above method fails you can try creating a new G-mail to associate with your current account in this mode and once again log in to your account from the lock screen using WiFi from the too many pattern attempt screen.

I hope that the method above worked for you or this one on: 

How to unlock your Samsung Galaxy after Too many pattern Attempts or Forgotten Password.


Which is your best bet, the issue of Too many pattern attempts is really annoying but its not impossible to fix trust me on that one. 

If you have any questions or concern feel free to use the comments section below and I will be sure to get back to you. 

Tuesday, July 22, 2014

My laptop turns on black screen

Hey there guys and welcome to another one of my: Do it Yourself fixes where I look at common PC issue and teach you how to solve the problem in simple and easy to follow steps. One such problem is your Laptop turns on black screen then nothing and your device is rendered almost useless.

So lets looks at the issue and possible solutions to the problem to have your beloved laptop up and running again:
laptop turns on black screen
My laptop turns on black screen


Problem:  laptop turns on black screen

Symptoms: The symptoms of this problem may include the device display shows a black screen and the internal fans are still running. The power led and hard drive activity led may or may not flash as the device seems to be powered on but nothing on the display.

Causes: There are two (2) possible causes of this problem and slight variations could mean that its one or the other causing the laptop to turn on to a black screen:

1. A faulty stick of RAM is preventing the laptop from booting successfully, it tries to boot but fails but instead of a outright failure it  manages to boot to a black screen.

2. The second cause which is more unlikely may be caused by the LED back light of the display going out due to a faulty or a dead inverter that powers the monitor.

Solution:


Case 1: Faulty RAM

In case one (1) which is usually the culprit you will have to find and replace the faulty RAM stick. I have seen this issue with desktops and Laptops although it quite often happens more in laptops.

Luckily most modern Laptops have at least two (2) sticks of RAM and chances are only one is faulty and the laptop can run on one just fine until the replacement arrives or you could borrow a stick from another device to use for testing.

You are going to want to open the back panel and access the RAM this should be easy and accessible by a easy to remove back panel.Simply remove the panel and remove both stick of RAM clean the slots with compressed air or by blowing into the slots (Dust May cause RAM to stop working).

Clean the ram sticks and put back only one stick in Slot 1 or A and try booting, do the same with the second stick of RAM until you find the one that is causing the device not to boot. Once you have found it simply close up the laptop with the functional stick. You should now be good to go, you may purchase a replacement stick of RAM later.

Case 2. Damaged Inverter

To figure out if the monitors inverter is out or faulty, when the device powers up to the black screen carefully tilt and look on the screen very carefully to see if you can see any windows icons that are slightly visible, you can also use the aid of a flash light. If you hear windows boot and you can see slight menus and windows elements faintly in the background the inverter is blown.

In this case you will have to open the screen of the laptop and remove the faulty inverter, then match its make and model and order a new one and replace the damaged inverter. They are relatively cheap and not too difficult to replace.

I hope that this tutorial has helped you in fixing the Issue of your laptop turning on to a black screen today. If your problem is slightly different or you have a question feel free to use the comments and I will get back to you as soon as possible.

Monday, June 16, 2014

How to add a floating social bar widget to Blogger


floating social bar
Encourage your Readers to share your content

In today's article I will be teaching you guys how to add a fully customizable floating social bar widget to Blogger or Floating Social Media Share Widget as it is sometime called as well, you can see a example of this on your immediate left that has all the major social networks for your readers to share your content, this includes: Twitter, Facebook, StumbleUpon, Google + and sharing options for every other possible social media website that you can think of.
 floating social bar


How to install the floating social bar?

 From the Blogger dashboard:
1. Click on the drop down button of the desired website and select: Layout.
2. Look for the Add a Gadget option and select it.
3. From this menu look for the: HTML/JavaScript option and select it.
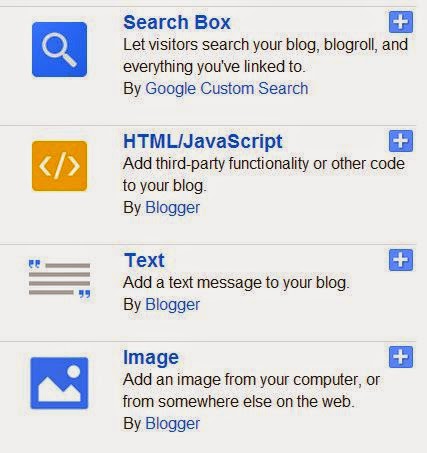
 floating social bar
Select HTML or JavaScript

4. In the resulting box: Customize the code from below or add the sample given to get your very own floating Social bar widget on the left of your blog.
5. Save and update and your social sharing button will be live on your website.

 Sample Floating Social bar Widget for Blogger

Copy the code as given below into the HTML/JavaScript Widget:

<!-- AddThis Button BEGIN -->
<div class="addthis_toolbox addthis_floating_style addthis_counter_style" style="left:03px;top:300px;">
<a class="addthis_button_linkedin_counter" li:counter="top"></a>
<a class="addthis_button_tweet" tw:count="vertical"></a>
<a class="addthis_button_facebook_like" fb:like:layout="box_count"></a>
<a class="addthis_button_google_plusone" g:plusone:size="tall"></a>
<a class="addthis_counter"></a>
</div>
<script type="text/javascript">var addthis_config = {"data_track_addressbar":true};</script>
<script type="text/javascript" src="//s7.addthis.com/js/300/addthis_widget.js#pubid=ra-516ff8e04b04378b"></script>

<!-- AddThis Button END -->

Customize your Very own Social bar Buttons
To customize the look and feel of your Social media buttons simply start by copying the base template and add the buttons that you desire one line at a time (Replace the blue line below) and your widget will look just the way you like:

Base Template Code:

<!-- AddThis Button BEGIN -->
<div class="addthis_toolbox addthis_floating_style addthis_counter_style" style="left:03px;top:300px;">
(Place your desired buttons here one line at a time replacing this entire line)
<a class="addthis_counter"></a>
</div>
<script type="text/javascript">var addthis_config = {"data_track_addressbar":true};</script>
<script type="text/javascript" src="//s7.addthis.com/js/300/addthis_widget.js#pubid=ra-516ff8e04b04378b"></script>

<!-- AddThis Button END -->

Social Media Button Codes:

Replace the blue line of code with any combination of the following, one code per line and in the desired order you want to organize your social button. 

Twitter: (Copy the code below this line)

<a class="addthis_button_tweet" tw:count="vertical"></a>

Google+:
<a class="addthis_button_google_plusone" g:plusone:size="tall"></a>

Facebook:
<a class="addthis_button_facebook_like" fb:like:layout="box_count"></a>

LinkIN:
<a class="addthis_button_linkedin_counter" li:counter="top"></a>

StumbleUpon:
<a class="addthis_button_stumbleupon_badge" su:badge:style="5" >

Extra Facebook Buttons :

For the additional Facebook Buttons Try:
1. Facebook Send Button:

 <a class="addthis_button_facebook_send"></a>

2. Facebook Like button with Friends counter:

 <a class="addthis_button_facebook_like" fb:like:layout="standard"></a>

I hope this helps you in creating the perfect Social Media Button that suits your Needs and looks just the way you like. Be sure to leave a comment below and let me know how things turned out for you.


Sunday, June 15, 2014

How to Get Free satellite TV

I know what you might be thinking, that its actually a gimmick and that its not possible to actually get free satellite TV without paying for it. But I assure you not only is it possible but you can also get thousands of free channels and it will not cost you a penny.
Free satellite TV online


It is actually possible to get free satellite TV online and enjoy premium content.


How to actually get Free satellite TV online?


The program that we will be using to get Free satellite TV online is called: Readon TV Movie Radio Player and is all you will need to actually start enjoying thousands of free channels that you can watch as you please.


What is Readon TV Movie Radio Player?

Free satellite TV online
Readon TV Movie Radio Player

Readon TV Movie Radio Player is a Free satellite TV online streaming service that provides free Tv from all over the world that can be streamed by country, free Radio and best of all you can pause the live streams which makes it more convenient than traditional satellite or cable Television. 

The program is only a few megabytes and instillation is a synch, Stations are all categorise alphabetically and by country, you can even search for channels by name. The interface is simple and intuitive so you do not have to worry about a steep learning curve as you will feel right at home a few minutes after installing the program. 

Sports fans are not left out as there are quite a few sports channels and it supports streaming and recording Tv straight to VLC player. What makes Readon TV Movie Radio Player so cool is the fact that it also links to great third paty TV players all from the built in interface. 

Supports a variety of plugins to extend its functionality, this is hands down the best Free satellite TV program around as you are able to get the best of both worlds.


Download:


Get the Readon TV Movie Radio Player from the official website by clicking here

1. Scroll to the bottom of the page and download the zip file.
2. Unzip the file with a program such as Winrar and install the file from the installer.
3. Launch the program and once you have an active Internet connection select a channel and enjoy the programs.

If the above link does not work or you would like a updated version of the program download it from here (Green download link on the left).

I hope that we were able to fill your needs by pointing you to a great program for free satellite TV, if you have a suggestion or just want to say hi leave a comment below.

Sunday, June 1, 2014

Windows XP support until 2019

The following mod will extend your Windows XP Support Until 2019 and allow you to get security updates. This is a welcomed mod, as you may know that Microsoft official support of Windows XP has ended and this may be your last chance to keep a hold on one of the best operating systems that Microsoft has ever made.

windows xp support
Extend Windows XP Support an additional Five (5) years

Wednesday, May 28, 2014

Blogger Pages so simple a baby could do it.

blogger pages
Create blogger pages.

Blogger Pages are a must have on any blog and this stays true even for blogger blogs. Recently Blogger did a major revamp of there pages and it now possible to actually see key statistics of your pages and what views they receive.


Also if you are a part of the Adsense program its very important that you have key pages such as: Privacy Policy, about and a contact page. So if you do not know what a page is or how to start one its critical that you learn now.

Tuesday, May 27, 2014

Use ColorZilla to blend Adsense Ads Perfectly

Did you know that there was a simple browser extension out there that can make matching and finding colors on a webpage very simple? this browser extension is know as: ColorZilla and is available for Chrome and Firefox.

 ColorZilla
 ColorZilla


 Install ColorZilla for Firefox or Google chrome. After instillation click the ColorZilla in browser icon and select page color picker and paste the color code into any application that accepts color codes that you want to customize such as adsense and much more.

Monday, May 26, 2014

Show file extensions windows 8

By default windows 8 will hide the file extensions of all files from the average user as most users do not need to see the extensions of every file that's on there computer.
Show file extensions windows 8
Show file extensions Windows 8

On the other hand more advanced users need this feature and it can be a great feature to enable seeing that seeing file extensions can tell you a great deal about a file even before you open it.


Monday, March 31, 2014

How to Log into your D-link Router?

D-Link DIR-601 Wireless-N 150 Home Router

D-Link DIR-601 Wireless-N 150 Home Router


Have you ever wondered how to actually log into and interface with your D-link router? then you are in the correct place, we will teach you how to log into and take control of your router so that you can perform some advanced features that can only be done from within the routers control panel.

Wednesday, March 19, 2014

Recover sent pictures in whatsApp without any special software

Recover sent pictures whatsApp
What have you been up to?...

Yes you read the title of this article correctly. You can actually recover your sent pictures without need of any special software if you are a user of the whatsapp Android messaging App.


Tuesday, March 18, 2014

How to Uninstall Apps and clear cache and data on your Android phone?

Uninstall Apps and clear cache and data Android
Have complete control over your Apps and your private data.

When you know your way around Android similar to a windows PC there are several nifty features that you can perform that will not only increase your privacy but also help in getting rid of unwanted programs.


Monday, March 17, 2014

Disabling Easy Mode on Samsung Galaxy S4

Disabling Easy Mode Samsung Galaxy
Samsung Galaxy S4 Easy Mode

If for some reason your Galaxy S4 is stuck in a strange mode with limited options and does not look the way the regular Galaxy S4 should look, then for some strange reason you have found yourself in Samsung's Easy Mode.


Thursday, February 13, 2014

I have written a Viral Blog Article, So what now?

Promote your blog posts
Get your Articles Noticed.

Most Bloggers think they know what should be done after writing a Hit Article but if you write the worlds best article and no one sees it, its like composing Beethoven's ninth symphony and hiding it under the bed were no one will ever find it any time soon.

And if someone were to find it by some blind luck it might be past the time it could have had its full impact on the internet and our way of thinking or viewing a concept.